PHP+CodeIgniter3+Bootstrap4:コントローラクラスとビュー。画像等静的リソースの参照方法など。
CodeIgniterフレームワークとBootstrap4を使って、「Hello world
」の代わりに簡単な画面でも作ってみます。

まずはCodeIgniterの処理フローの理解
CodeIgniterの凄く良いところ。
とにかく、ドキュメントがわかりやすくて良いです。
フレームワークの全体の処理の流れも、こちらにとても明確にまとめてあります。
図を引用します。

入口は常に「index.php」。
そこからルートを取得し、セキュリティのフィルタがかかってから、コントローラにはいってくる。
コントローラの中でライブラリ・モデル他を使って処理をして、ビューにセットして、キャッシュ機構を通して戻して表示。
こんな感じなんですね。
いやあ。
わかりやすい。
プロジェクトに合わせて設定を変える
まず、しておくことは、Config.phpの「$config['base_url'] 」の設定です。
ここに設定するのは、「<?php echo base_url('cssとかjsとかのパスとファイル名'); ?>」のように使う「base_url」関数が返すURLです。
主に利用するのは。
イメージやCSSやJavaScriptなどの静的コンテンツの取得パスの指定です。
CodeIgniterの場合。
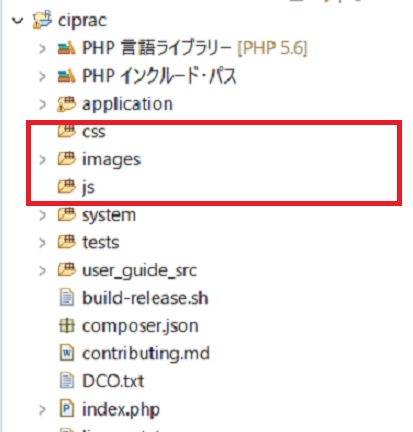
index.phpのあるプロジェクトのルートに各静的コンテンツの置き場所(フォルダ)を作るのが簡単です。
今回は「ciprac」というプロジェクト名にしてます。
そのルートに「images」「css」「js」というフォルダを作りました。

なので、config.phpの設定は「$config['base_url'] = 'http://localhost/ciprac/';」となるわけなのですね。
コントローラクラスを用意する
Hello world代わりに簡単な「ほぼ静的なページ」を表示させてみます。
こんな感じの。

せっかくなので、画像の上下の「ýou Was・・・」の部分と、下の英語の説明文とページタイトルは、HTMLにべた書きするのではなくて、コントローラクラスからデータを渡すようにしてます。
と・・いうことで。
まず最初に準備するのはコントローラクラスです。
場所とファイル名は「application/controllers/Pages.php」にしときます。
まずはコードから。
    <?php
defined('BASEPATH') OR exit('No direct script access allowed');

class Pages extends CI_Controller {

    public function index($page = 'pagebody')
    {
        if ( ! file_exists(APPPATH.'views/pages/'.$page.'.php'))
        {
            show_404();
        }

        $this->load->helper('url');
        $this->load->helper('html');

        $data['title'] = ucfirst($page);
        $data['infotitle'] = "You Was Born To Die - BLIND WILLIE McTELL";
        $data['info'] = "Blues Musician, Composer. Born Willie Samuel McTell, blind at birth. His mother taught him how to play the guitar when he was a teenager. He played both the 12-string and the 6-string guitar. He wrote the song that the Allman Brothers made popular in 1969, Statesboro Blues.";

        $this->load->view('templates/header', $data);
        $this->load->view('pages/'.$page, $data);
        $this->load->view('templates/footer', $data);
    }
}
?>
data['info']に渡している文字列が長いのですけど、単なる英語の説明文です。
一応、こんな文章です。
Blues Musician, Composer. Born Willie Samuel McTell, blind at birth. His mother taught him how to play the guitar when he was a teenager. He played both the 12-string and the 6-string guitar. He wrote the song that the Allman Brothers made popular in 1969, Statesboro Blues.
簡単にコードの意味を確認しときます。
クラス名はファイル名と同じ
Pages.php なので、クラス名はPages)です。
こうしとかないと単体テスト(PHPUnit)でエラーになりますからね。
おまじないコードは必ず書いておく
defined('BASEPATH') OR exit('No direct script access allowed');
ようするに、index.phpを通さない直接呼出しは許さないぞ・・という感じですかね。
viewのファイルの存在チェックも忘れず
if ( ! file_exists(APPPATH.'views/pages/'.$page.'.php')){
show_404();
}
PHPのメソッドを使って、ファイルの存在チェックをして、なかったら404エラーページを表示するメソッド<CodeIgniter組み込みの show_404()>を呼ぶわけです。
ヘルパー関数をロードする
$this->load->helper('url');
$this->load->helper('html');
でURLヘルパーと、HTMLヘルパーをロードしておきます。
この2つは、静的コンテンツをView内で参照するとかで、やたらと使うメソッドが含まれてます。
まあ、ロードしておいて損はない・・です。
パラメータはviewの引数で渡す
$data['title'] = ucfirst($page);
みたいに、$dataの配列(連想配列)にセットして、view()のパラメータにして、viewで指定したphpファイルの中で、それを参照します。
例えば、コントローラ内で $data['title'] とすると、 ビュー内では $titleで参照できる感じです。
後で動的にデータを作った時も、同じようにすればよいわけですね。
うーーん。わかりやすいぞ。
後はほぼViewのファイル名の指定だな
$this->load->view('templates/header', $data);
$this->load->view('pages/'.$page, $data);
$this->load->view('templates/footer', $data);
の部分。
views/templates/header.php
views/pages/pagebody.php
views/templates/footer'php
を使うということを指定してるわけですね。
($pageには上で pagebody をセットしてるから)
viewsのPHPファイルを作る
上記のコントローラクラスに合わせてViewを作ります。
上記の構成。
views/templates/header.php
views/pages/pagebody.php
views/templates/footer'php
これだと、この3つのPHPファイル3つで、ひとつの画面になります。
つまり、ヘダー部、ボディ部、フッター部にわけておいて、ヘダー部とフッター部は使いまわす使い方を想定してます。
あと、CSSは自前で用意するのが面倒なので、Bootstrapを使います。
さて。
まず「header.php」です。
   <!doctype html>
<html lang="jp">
<head>
<!-- Required meta tags -->
<meta charset="utf-8">
<meta name="viewport" content="width=device-width, initial-scale=1, shrink-to-fit=no">

<!-- Bootstrap CSS -->
<link rel="stylesheet" href="https://stackpath.bootstrapcdn.com/bootstrap/4.1.3/css/bootstrap.min.css" integrity="sha384-MCw98/SFnGE8fJT3GXwEOngsV7Zt27NXFoaoApmYm81iuXoPkFOJwJ8ERdknLPMO" crossorigin="anonymous">

<title><?php echo $title; ?></title>
</head>
<body>
<!-- Optional JavaScript -->
<!-- jQuery first, then Popper.js, then Bootstrap JS -->
<script src="https://code.jquery.com/jquery-3.3.1.slim.min.js" integrity="sha384-q8i/X+965DzO0rT7abK41JStQIAqVgRVzpbzo5smXKp4YfRvH+8abtTE1Pi6jizo" crossorigin="anonymous"></script>
<script src="https://cdnjs.cloudflare.com/ajax/libs/popper.js/1.14.3/umd/popper.min.js" integrity="sha384-ZMP7rVo3mIykV+2+9J3UJ46jBk0WLaUAdn689aCwoqbBJiSnjAK/l8WvCWPIPm49" crossorigin="anonymous"></script>
<script src="https://stackpath.bootstrapcdn.com/bootstrap/4.1.3/js/bootstrap.min.js" integrity="sha384-ChfqqxuZUCnJSK3+MXmPNIyE6ZbWh2IMqE241rYiqJxyMiZ6OW/JmZQ5stwEULTy" crossorigin="anonymous"></script>
<div class="container">
	<div class="row bg-primary text-white">
   		<div class="col-2">
            サンプル
    	</div>
    	<div class="col-2">
            ヘダー
    	</div>
    	<div class="col-8">
            CodeIgniterの練習です
    	</div>
    </div>
ポイント「 <div class="container">」までは、BootstrapのGet startのページにあるシンプルテンプレートのコピペです。
それ以外の部分は、Bootstrapのクラスを使ってます。
クラスの使い方は、こちらのサイトを参考にしました。
次は「footer.php」です。
   	<div class="row bg-primary text-white">
   		<div class="col">
            フッター
        </div>
    </div>
</div><!-- container -->
</body>
</html>
<div class="container">の範囲はheader.phpとfooter.phpにまたがっています。
まさしく、分割です。
そして,真ん中の「pracbody.php」です
   <div class="row">
  	<div class="col text-center">
  		<h1><?php echo $infotitle; ?></h1>
  	</div>
  </div>
  <div class="row">
  	<div class="col my-2 text-center">
  		<?php echo img('images/sample.jpg'); ?>
  	</div>
  </div>
  <div class="row">
    <div class="col my-2">
    <p class="card-text m-2"><?php echo $info; ?> </p>
  	</div>
  </div>
ここは2つポイントがあります。
コントローラからの値の受け渡し
<h1><?php echo $infotitle; ?></h1> とか。
<p class="card-text m-2"><?php echo $info; ?> </p>とか。
ここの$infotitleや$infoというのは、コントローラクラスで、それぞれ$data['infotitle]と$data[info]にセットした値を受け取ってます。
表示するには、echoと組み合わせる必要があります。
画像イメージの表示
<?php echo img('images/sample.jpg'); ?>の部分です。
これは。
<img src="<?php echo base_url('images/sample.jpg'); ?>">
と書いても同じことができます。
実は、CSSとかJSとかみたいな静的リソースの取得方法は、これと同じです。
<?php echo base_url('images/sample.jpg'); ?>の部分ですね。
後は、<img>タグの部分がlinkになったりとかするだけですね。
ここでbase_urlがでてきます。
うまくいかない時は、config.phpの設定が大抵間違ってます。
ブラウザに表示させてみる
ここまででも、表示させることはできます。
localhostでApatchが立ち上がっているとしたら。
http://localhost/[プロジェクト名]/index.php/[コントローラクラス]/[コントローラクラスのメソッド
と指定すればよいです。
今回の例だと「http://localhost/ciprac/index.php/Pages/index」みたいな感じです。
でも。
いまいち、スマートではありません。
毎回、プロジェクト名とinput.phpを指定しないといけないですから。
とりあえず、今回のページをこんな感じのURLで呼び出せるようにしてみます。
(localhostで動かすとして)
http://localhost/[プロジェクト名]/
そうするには、ルート設定をします。
application/config/routes.php で以下を設定します。
index.php/Pages/indexの部分を指定しないですむようにこんな感じで変更します。
$route['default_controller'] = 'Pages';
さてさて。
これで、http://localhost/ciprac/ でアクセスできます。
何故かというと、「default_controller」は、なにもデータがない場合に呼び出されるべきアクションとして予約済の名前だからです
かつ、メソッド名を指定しない場合は index() がデフォルトになりますから、上記のURLで「Pages/index」にアクセスできるわけです。
さて、これで、Hello World代わりの確認は終わりです。